scrapnnana
Drama Llama
 
Posts: 6,449 
|
Post by scrapnnana on May 26, 2020 14:28:46 GMT
As many of you know, I love interactive cards. However, this one is actually fairly easy, so I hope you will give it a try. Shaker cards have been around for literally decades. Last year, shaker cards seemed to make a bit of a comeback, although with some differences. This challenge is to make a shaker card. If you have never made one before, here is how to make a basic shaker with items you probably have on hand: 1. Start with a stamped and colored square or rectangle OR use a cut-apart/pocket card. Cut a clear piece of acetate to match. You can use packaging for this. The acetate is to keep your shaker fillings from escaping. 2. Use foam tape to build a sort of frame around the edge, exposed sticky side down. Do NOT remove the protective paper. 3. Fill with glitter, microbeads, and or sequins. You can mix up your fillings. If you build a two layer foam tape border, you can use thicker fillings such as buttons. Put in just enough to shake, but not so much that your stamped or card image won’t show fairly well. 4. Carefully remove the protective paper without jostling your card in preparation for step 6. Set it aside where it won’t get bumped, or you can reverse the order of steps 4 and 5. This is just the order that I prefer. 5. I use an unused dryer sheet to gently wipe the piece of acetate on the side that will be down against the filling. Some people use baby powder or a special powder bag that removes the static cling. Acetate definitely has static cling. Another option is to “huff” on it, but if you use candy sprinkles (which can be another filling option), you don’t want moisture inside the shaker. If you use a dryer sheet or powder, check to make sure it still looks clear and not cloudy. 6. Carefully place your acetate over the top of your shaker. Run your finger around the edge to make sure there are no gaps. 7. Cover the tape with a paper frame that covers only the foam tape so that it doesn’t show. Shake it!  Shaker cards are fun for all ages! Now for a sample of a basic shaker that I made with a Christmas pocket card a couple of years ago, using the steps above. Unfortunately, I should have added more microbeads. The filling doesn’t show up very well in the photo. Look at the bottom edge, and you can kind of see the shaker filling: 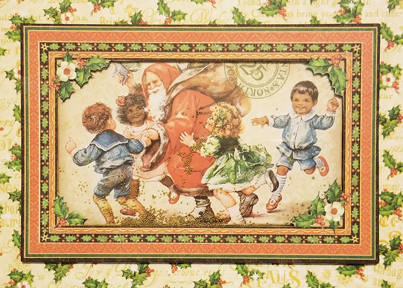 This is just the simplest shaker. Shaker cards definitely have more options, as I will show in a minute. |
|
scrapnnana
Drama Llama
 
Posts: 6,449 
|
Post by scrapnnana on May 26, 2020 14:55:30 GMT
Next, for some additional options........  The next card, like the Goofy hat card, was made using shaker dies from Queen and Company, BUT you can do something similar for a basic shaped card by using two different sized circle (or other nesting) dies taped together to create a shaker frame. I cut the black cardstock frame, then I cut two additional frames from fun foam. I glued the fun foam frames together with Aleene’s tacky glue. Then you would remove the inside circle die, and use just the larger, outside circle die to cut a back piece of card stock to match (optional), and also to cut the matching acetate circle. If you are gluing directly to a card front, you do not need the back card stock piece. That is why it is optional. If you are making a different shape with nesting dies, or something other than a Mickey head, stamp and color a design on the back piece of card stock. Or you could use the nesting die to cut a back piece from a patterned paper or a pocket card. Build your shaker using the same steps in the top post, EXCEPT you will need a special glue to glue the acetate to the fun foam OR use tiny pieces of red line tape to attach the acetate to the fun foam. The glue that I use is called Sheer Glue and is from Queen and Company. Use the same glue (or tiny red line tape pieces) to attach your card stock frame layer on top of the acetate. The reason you need this special glue (or red line tape) is because nothing else will stay stuck to the acetate. The Aleene’s can come apart from the acetate when the glue is dry. 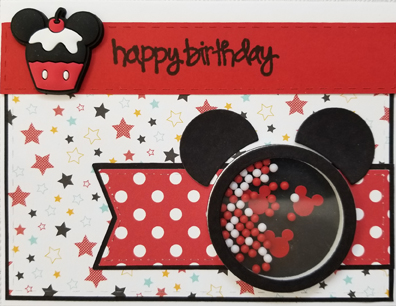 This next card was made using shaker dies and a matching pre-cut foam shaker frame from Queen and Company: 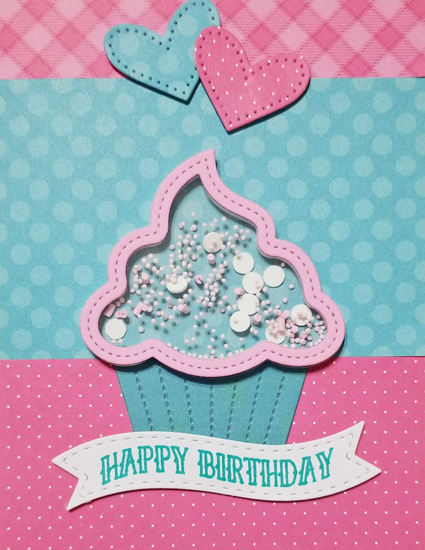 For my last example, See next post. |
|
scrapnnana
Drama Llama
 
Posts: 6,449 
|
Post by scrapnnana on May 26, 2020 15:00:44 GMT
One note before I move on to the last example. If you don’t have nesting dies, but you have a Silhouette Cameo, you can cut several layers of a shaker frame from card stock or light weight chip board to glue together for a shaker frame instead of using fun foam. The Cameo 3 can cut fun foam for shaker frames (you’ll need two per shaker). You will need the deep cut blade, set to 20. The Cameo 3 has a fun foam setting. You can use the software to make a shaker frame from any simple basic shape, such as a balloon. Use the offset feature to make the shaker frame. Silhouette also has a few shaker designs they sell, but not that many. Finally, My Favorite Things makes acetate shakers and matching dies. The molded acetate shakers pop through die cut openings in the card and require matching dies. The adhesive is placed on the top extended edges of the circles, so they will adhere to the back side of the card front. The lower left image shows how it looks after popping it through from behind. This is a triple circle window from MFT. The right glue or adhesive really matters if you plan to mail it.  Here is one that I made using a My Favorite Things shaker and matching die. The little girl is also from one of their stamp sets. I embossed it after I cut it, but before I adhered the acetate shaker window piece. 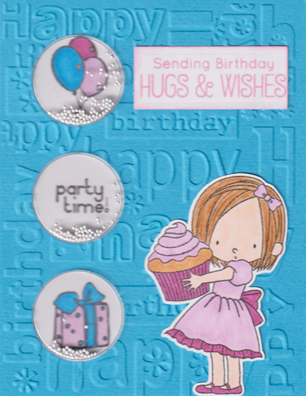 I hope you have fun with this challenge! |
|
Deleted
Posts: 0
Nov 22, 2024 9:56:11 GMT
|
Post by Deleted on May 26, 2020 17:47:47 GMT
6. Carefully place your acetate over the top of your shaker. Run your finger around the edge to make sure there are no gaps. 7. Cover the tape with a paper frame that covers only the foam tape so that it doesn’t show. Shake it! I so want to do this, but this is the part I don't understand. How do you get the shaker to pop through the card? Are there any very very basic youtube videos you can suggest? Thanks! |
|
scrapnnana
Drama Llama
 
Posts: 6,449 
|
Post by scrapnnana on May 26, 2020 22:02:54 GMT
The first examples are not popping through the card. Each of the shakers in the first two posts are actually built in layers and glued on top of the card front. I’ll see if I can find a video.
Only the last example is popping through the card. I used a matching die and windows sold by My Favorite Things for that.
|
|
azcrafty
Pearl Clutcher

Posts: 2,955
Jun 28, 2019 20:24:21 GMT
|
Post by azcrafty on May 26, 2020 22:40:20 GMT
Beautiful cards scrapnnana. I have been thinking about buying some of the Queen & co. shaker kits. Usually the ones I like are sold out and I never go back to look from them again. Do you have to buy the shaped foam all the time or have you tried to cut fun foam with the dies? |
|
|
|
Post by grammadee on May 26, 2020 23:30:33 GMT
LOVE all the shaker cards, scrapnnana! My favourites are the Mickey and the cupcake, but I love them all. I don't have many beads, but I do have lots of sequins, and a roll of foam tape. Might be time to try my hand at one of these cards again! |
|
Deleted
Posts: 0
Nov 22, 2024 9:56:11 GMT
|
Post by Deleted on May 26, 2020 23:49:19 GMT
This is a great challenge scrapnnana, because it is really a new skill. One more question about shaker cards that I have always had is when you do the card where you build it up and adhere it to the front of the card, if you look at the side of the shaker, will you see all the foam adhesive? I just can't think of a way you would cover up the sides. Thank you!! |
|
scrapnnana
Drama Llama
 
Posts: 6,449 
|
Post by scrapnnana on May 27, 2020 0:03:51 GMT
Beautiful cards scrapnnana . I have been thinking about buying some of the Queens co. Shaker kits, just never made it happen. Usually the once I like are sold out and I never go back to look from them again. Do you have to buy the shaped foam all the time or have you tried to cut fun foam with the dies? Thank you. I have bought far too many of the Queen and Company kits lately. I don’t have any affiliation with them. I just love their kits. Buying the shaped foam refills makes it easy, but as long as you have the shaker die and the matching outline die, you can cut your own shaped foam pieces. With fun foam, you need to cut two, then glue the two foam pieces together (like a short stack of pancakes). Some of their kits come with both the shaker die and the matching outline. Some don’t. Their new shaped card sets include the outline, but most of the older sets don’t, so you have to buy it separately. However, I have gotten around this by cutting the shaker from black, scanning it in, then tracing the outline in my Silhouette software. That lets me cut the acetate piece, as well as an outline base with my Cameo. |
|
azcrafty
Pearl Clutcher

Posts: 2,955
Jun 28, 2019 20:24:21 GMT
|
Post by azcrafty on May 27, 2020 2:49:47 GMT
Thank you scrapnnana. I just got on the website and really like the bug jar, but I have to get the love jar too. I can see that this can add up really fast. Do you have that one? |
|
scrapnnana
Drama Llama
 
Posts: 6,449 
|
Post by scrapnnana on May 27, 2020 4:48:06 GMT
Thank you scrapnnana . I just got on the website and really like the bug jar, but I have to get the love jar too. I can see that this can add up really fast. Do you have that one? I have them, but I did not buy them all at once. It can definitely add up really fast. |
|
scrapnnana
Drama Llama
 
Posts: 6,449 
|
Post by scrapnnana on May 27, 2020 4:51:51 GMT
This is a great challenge scrapnnana , because it is really a new skill. One more question about shaker cards that I have always had is when you do the card where you build it up and adhere it to the front of the card, if you look at the side of the shaker, will you see all the foam adhesive? I just can't think of a way you would cover up the sides. Thank you!! You do see the foam sides, although if you use fun foam in the same colors as your card stock shaker, it’s not as noticeable. And to be honest, seeing the sides even if the foam is white, it doesn’t matter. The receiver is more interested in the movement of the shaker. I don’t bother trying to cover up the sides of the shaker. I did find a video by Taylored Expressions that may be helpful. And tomorrow I will try to post some additional photos that will hopefully be helpful. Sorry about the typo in the name of the link below (it should read Taylored Expressions): Taylord Expressions Simple Shakers |
|
scrapnnana
Drama Llama
 
Posts: 6,449 
|
Post by scrapnnana on May 27, 2020 18:09:40 GMT
I added some process type photos to the first few posts. I hope they will make the instructions and information more clear.
Companies who make and/or sell shaker dies/sets, such as Queen and Company and My Favorite Things, may also have videos.
Let me know if you have any additional questions. I hope you have as much fun making shaker cards as I do!
|
|
|
|
Post by jjpeapea on May 28, 2020 13:36:05 GMT
Thanks for the shaker card challenge, scrapnnana . Your varied examples are lovely. I've been wanting to include real shells in a shaker ever since I saw one somewhere.  |
|
|
|
Post by stormsts on May 28, 2020 14:55:56 GMT
Thank you for the instructions scrapnnana. I have always wanted to try one but just never sat down to learn how to do it. |
|
scrapnnana
Drama Llama
 
Posts: 6,449 
|
Post by scrapnnana on May 28, 2020 16:14:59 GMT
Thank you, jjpeapea, and I am glad you joined in the fun. Your card is absolutely adorable! I love that you added the tiny shells to your shaker. Your mermaid is very cute, and the sentiment with that glitter cardstock is perfect. |
|
scrapnnana
Drama Llama
 
Posts: 6,449 
|
Post by scrapnnana on May 28, 2020 16:17:24 GMT
Thank you for the instructions scrapnnana . I have always wanted to try one but just never sat down to learn how to do it. You’re welcome. I will look forward to seeing you share your shaker here. |
|
azcrafty
Pearl Clutcher

Posts: 2,955
Jun 28, 2019 20:24:21 GMT
|
Post by azcrafty on May 28, 2020 20:08:13 GMT
 ![]() ![]() Here is my shaker card. I used a embossing folder with a built in die. |
|
|
|
Post by joblackford on May 28, 2020 23:30:30 GMT
6. Carefully place your acetate over the top of your shaker. Run your finger around the edge to make sure there are no gaps. 7. Cover the tape with a paper frame that covers only the foam tape so that it doesn’t show. Shake it! I so want to do this, but this is the part I don't understand. How do you get the shaker to pop through the card? Are there any very very basic youtube videos you can suggest? Thanks! I haven't watched any of these lately but Vicki P on YT was the person I watched make shaker cards a lot before I tried my first one. Her videos are usually pretty clear and easy to follow. Here are some examples that might be helpful www.youtube.com/results?search_query=vicky+papaioannou+shaker+cardor try Kristie Marcotte www.youtube.com/results?search_query=kristie+marcotte+shaker+card |
|
scrapnnana
Drama Llama
 
Posts: 6,449 
|
Post by scrapnnana on May 29, 2020 2:35:50 GMT
azcrafty, your card is beautiful, and I think that was a very clever idea to use an embossing folder with a built in die!
|
|
azcrafty
Pearl Clutcher

Posts: 2,955
Jun 28, 2019 20:24:21 GMT
|
Post by azcrafty on May 29, 2020 4:56:48 GMT
azcrafty, your card is beautiful, and I think that was a very clever idea to use an embossing folder with a built in die! I have a few of this kind of embossing folders. I really love them . Thank you |
|
azcrafty
Pearl Clutcher

Posts: 2,955
Jun 28, 2019 20:24:21 GMT
|
Post by azcrafty on May 29, 2020 14:03:50 GMT
|
|
Deleted
Posts: 0
Nov 22, 2024 9:56:11 GMT
|
Post by Deleted on May 30, 2020 13:36:07 GMT
So I had a go at this last night, after thinking I had one of those embossing folders with a die. The good news: It "looks" like a shaker card, as in there is a piece of clear plastic and items in there that will move. I also like the colors. The bad news: When I shook it, I covered myself in glitter. Also, I can see foam in the opening, which I do not like. Worst news: I literally FORGOT to stamp an image, lol! All that, and no stamp. I think that the circle shaker cards, (or oval in my case) must be MUCH harder to do "by hand" than a rectangle or square. I spent a lot of time getting the foam very carefully around the oval and it still leaked glitter everywhere. I did watch a sizzix video on how to use these dies/folders to make shaker cards, and I have to say she wasted a TON of foam, she used 2 foam sheets. Also, it looked like crap since you could see the foam and how it was all stuck together. Yours look 1000% more professional than the sizzix lady, scrapnnana.  |
|
scrapnnana
Drama Llama
 
Posts: 6,449 
|
Post by scrapnnana on May 30, 2020 22:24:58 GMT
Thank you, kendramage. Yes, an oval is definitely harder to have sealed. However, I also tend to avoid glitter. Microbeads roll nicer, and bigger stuff (sequins, buttons, etc.) is less likely to leak.
Using a shaker die with fun foam is also an option, but I suggest red line tape around the opening to stick it to your card. You can do two layers if you want to include something like buttons.
I think your shaker looks really nice, especially for a first attempt. Forgetting to stamp the center sounds like something that I would do. I’ve done it at least once. It’s an easy mistake to make.
|
|
|
|
Post by grammadee on May 31, 2020 3:40:56 GMT
@kendramage, I always want to use glitter in shaker cards--especially Christmas cards, b/c I want it to look like a snowglobe--but have never had good luck with them, unless I am using a ready made kit with the foam already shaped. Your card is a great first attempt. I like the oversize moving parts. Thanks for reminding us, scrapnnana , that we don't need foam tape to make a shaker card. Used an envelope of clear packaging material for this one:  shaker balloons shaker balloons by Gramma Dee, on Flickr |
|
scrapnnana
Drama Llama
 
Posts: 6,449 
|
Post by scrapnnana on May 31, 2020 17:39:23 GMT
That is a very glamorous birthday card, grammadee!
Thank you for bringing up the idea of alternate materials, too, for making shaker pouches. I just saw a shaker made with a clear envelope a couple of days ago, and it looks like a good option for those using glitter.
|
|


