Deleted
Posts: 0
May 20, 2024 11:46:34 GMT
|
Post by Deleted on Feb 3, 2016 21:34:34 GMT
I have spent a good amount of time the past several weeks playing with the Print & Cut feature, learning how to download patterns and import them (I didn't know how to do that  )...lot's of stuff! I bought the eBook someone here recommended, and I've learned a lot--yeah! I still have a way's to go, but I'm getting there. BUT...I cannot find this, and I swore I read it, or saw it in a video, or something: isn't there a way to cut things in different orders? Example: I want to print a rose, have it kiss cut for a sticker, but I want that sticker to stay in tact inside say a 2x2 square until I'm ready to use it. Does that make sense? I know I can kiss cut the sticker, and then re-run the mat thru the machine to cut the outside square. But, I'd like to do it at once and not have to rerun the mat thru the machine. I swear there's a way to change the color of the cut lines and have them cut in different orders. Anyone...please? |
|
|
|
Post by mom on Feb 4, 2016 4:15:27 GMT
@devildog
Yes, you can do this.
Try this:
Look under the cut settings, choose advanced
In advanced, choose the cut order (either layer, line color or fill color
Then send to Silhouette
I am pretty sure this is what you are trying to do.
|
|
|
|
Post by mom on Feb 4, 2016 4:17:21 GMT
And try this method. I bet it may be closer to what you are needing: LINK |
|
Deleted
Posts: 0
May 20, 2024 11:46:34 GMT
|
Post by Deleted on Feb 4, 2016 23:52:57 GMT
devildogYes, you can do this. Try this: Look under the cut settings, choose advanced In advanced, choose the cut order (either layer, line color or fill color Then send to Silhouette I am pretty sure this is what you are trying to do. Thanks so much. I was playing around with this today, and then did some more searching, and am still having trouble. Frustrated would be an understatement. Thanks again. |
|
Loydene
Pearl Clutcher

Posts: 2,639  Location: Albuquerque, New Mexico
|
Post by Loydene on Feb 5, 2016 4:02:16 GMT
I think I read something like this -- maybe what you are thinking of doing -- it was in the Silhouette School blog when she was talking about saving vinyl -- she was cutting the inside out of a heart ... cutting through the vinyl background intentionally ....
It is also pretty recent because she was going a valentine design ...
|
|
iowgirl
Pearl Clutcher
Posts: 4,135
|
Post by iowgirl on Feb 5, 2016 5:49:33 GMT
So you are wanting the sticker kiss cut onto the backing paper, but you want the actual area around the sticker, say a 2" square cut all the way through the paper?
You would have to do that in two passes, because you would need to adjust the blade and the pressure settings. You would turn the cut line off for your outer box and do the kiss cut rose. Don't unload the mat. Go back in the software and turn on the cut lines for the box, turn off the cut lines for the rose, adjust your blade and cut settings and then "send to silhouette" again to cut the sticker all the way out of the paper.
|
|
Deleted
Posts: 0
May 20, 2024 11:46:34 GMT
|
Post by Deleted on Feb 5, 2016 11:08:21 GMT
So you are wanting the sticker kiss cut onto the backing paper, but you want the actual area around the sticker, say a 2" square cut all the way through the paper? You would have to do that in two passes, because you would need to adjust the blade and the pressure settings. You would turn the cut line off for your outer box and do the kiss cut rose. Don't unload the mat. Go back in the software and turn on the cut lines for the box, turn off the cut lines for the rose, adjust your blade and cut settings and then "send to silhouette" again to cut the sticker all the way out of the paper. I bought the Ultimate Guide to the Silhouette/Stickers eBook (or something along those lines) from the Silhouette School, and what you explain is how it says to do it in the book. But somewhere along the way, either in a video or somewhere, I saw you could do it without removing the paper, pausing the machine, changing blade, etc. So THEN...I found this blog post: the-lilypad.com/cutting-stickers-with-your-silhouette/I was playing a bit again last night, and wanted to scream. Maybe I was just tired/cranky, OR maybe I just need to play with my settings again, but it wasn't quite right. Putting some more time into this later today; it's becoming an obsession to make this work, lol. |
|
Deleted
Posts: 0
May 20, 2024 11:46:34 GMT
|
Post by Deleted on Feb 5, 2016 11:11:01 GMT
|
|
iowgirl
Pearl Clutcher
Posts: 4,135
|
Post by iowgirl on Feb 5, 2016 15:04:28 GMT
I don't do much with advanced cutting/cut by color. I will have to go give this a try.... It almost seems like she is leaving out a step during the cutting!
I will report back!
|
|
|
|
Post by acd on Feb 5, 2016 15:17:41 GMT
I applaud your desire and effort to learn all you can about this amazing machine. You seem to have the same LOVE/HATE relationship with yours that I have with mine.  Wouldn't it be nice to have a private teacher sitting right beside you?  Keep learning. You're motivating me. |
|
iowgirl
Pearl Clutcher
Posts: 4,135
|
Post by iowgirl on Feb 5, 2016 15:37:26 GMT
OK - I tried it without doing the print & cut - just setting up two sets of line to cut differently. As long as you don't have to change the blade, it worked perfect!
I drew my outside rectangle and set the line color to blue. That is my deep cut. I put a shape inside the rectangle. It already has the red line, so I did nothing to the line color.
I opened up my cut settings window and selected Advanced. Make sure you have "LINE COLOR" selected - so that shows. On the blue line I selected cardstock. I bumped up my thickness a little because I am using glossy photo sticker paper and it is a little thicker.
I selected the red line layer and chose the white sticker paper - but I had to back the thickness down a bit, because with the blade at 2, it was cutting all the way through. But once I had my cut settings right - it worked great.
I can post some more in depth instructions with screen shots if you need? You aren't a member of any of the Silhouette groups on Facebook are you? It is SO much easier to post screenshots and help on the FB boards.
|
|
Deleted
Posts: 0
May 20, 2024 11:46:34 GMT
|
Post by Deleted on Feb 5, 2016 17:15:00 GMT
I applaud your desire and effort to learn all you can about this amazing machine. You seem to have the same LOVE/HATE relationship with yours that I have with mine. Wouldn't it be nice to have a private teacher sitting right beside you? Keep learning. You're motivating me. YES--I've told my DH that so many times. My biggest problem/frustration is having to look thru 2 eBooks, Google, watch YouTube videos, etc. It can be brain numbing trying to troubleshoot when something goes wrong. Taking the machine out of the box and cutting is the easy part IMO. It's getting into the more in-depth, advanced functions that makes me want to scream. I've had my Cameo for years. It's just recently that I've branched out. This machine, though, is pretty impressive with what it can do. iowgirl -- I'm so happy you were able to make it work-that's given me hope, lol. I tried, and tried, and obviously was missing something. I worked and reworked some designs so many times I'm pretty sure I added/took out functions and couldn't figure it out to fix it. I'm not on Facebook (probably the only person on the planet) so I don't belong to any groups. Thanks for giving it a whirl! |
|
iowgirl
Pearl Clutcher
Posts: 4,135
|
Post by iowgirl on Feb 5, 2016 17:41:14 GMT
I have to leave for a few hours - but I will try to get you some screen shots posted here this evening! They will help make more sense of it.
I am super glad you posted this. I feel like I learned how to do something new today!
|
|
Deleted
Posts: 0
May 20, 2024 11:46:34 GMT
|
Post by Deleted on Feb 5, 2016 18:42:19 GMT
I have to leave for a few hours - but I will try to get you some screen shots posted here this evening! They will help make more sense of it. I am super glad you posted this. I feel like I learned how to do something new today! That would be SO nice of you; awesome! I wish I didn't have such a headache. I had every intention of heading downstairs by the machine and giving it another try. Maybe I'll feel better later. I feel like I'm so close... |
|
iowgirl
Pearl Clutcher
Posts: 4,135
|
Post by iowgirl on Feb 6, 2016 4:14:12 GMT
I started out with a set of stickers that already have cut lines around them. I did some test cutting on my sticker paper to figure out the right settings. Since the blade never changes - I needed to figure out what thickness setting were best for each cut - the one that went all the way through, and the "kiss cut". I was using a thicker glossy photo type sticker paper, so your settings will probaby be different. I also set up my Print & Cut page. The default line around the sticker is already red - so I do not assign a line color to that.... I then used the rectangle tool and drew a box around my sticker set. While the rectangle was still selected - I chose the line color tool, and then changed the line color to blue  I replicated the stickers/box so my page was filled as I wanted with them. Now open the cut style window. Click on ADVANCED to open up the advanced cutting settings. Make sure you have "line color" selected so that part shows below it. See the blue and red boxes - those correspond to the lines around the stickers (red) and the rectangle (blue). Make sure they have check marks in them. No check mark - no cut. 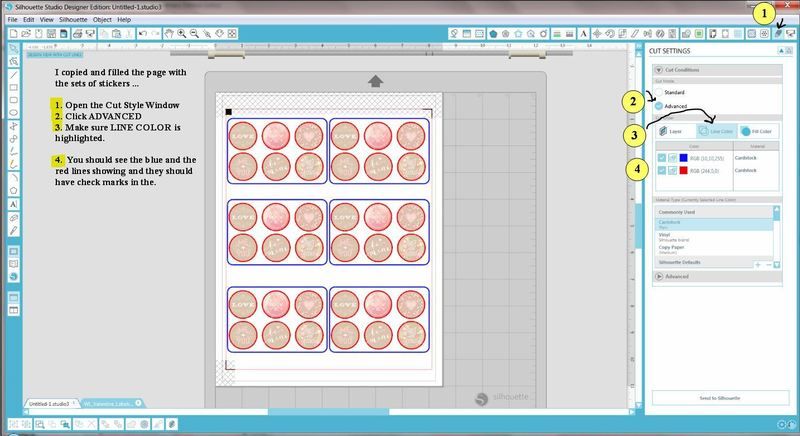 Now you want to set the cuts for those particular colors. I first chose the blue, that is the part that will cut all the way through. I set it to cardstock. I adjusted my thickness to 30. The blade in the machine is manually set on 2. The software will show 3 - but it doesn't matter what the software says (you can change it to 2 here if you want).  No I will go back and choose the RED settings. I want this to be the kiss cut on the circles. I chose White Sticker Paper as my media type. I backed off the thickness on this one to 8 because I was cutting all the way through my paper with the default settings. Now you have your settings all right - hit Send to Silhouette and it will read the registration marks and then start cutting. Mine first cut the blue rectangles and then went back and kiss cut the circles. They came out perfect. 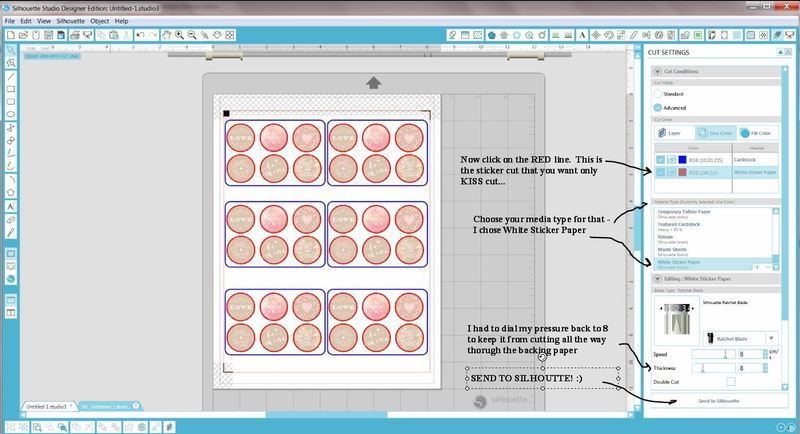 |
|
|
|
Post by scrappyoutlaw on Feb 6, 2016 5:35:54 GMT
iowgirl, thank you for a FANTASTIC tutorial! I have not cut stickers using my silhouette, but now I know how to adjust cut settings with great detail. You were so thorough and clear with your directions, I am so very appreciative. I printed it out and tucked it with my silhouette cheater papers that I keep. Yet another reason I love the peas, such a helpful bunch!
|
|
Deleted
Posts: 0
May 20, 2024 11:46:34 GMT
|
Post by Deleted on Feb 6, 2016 11:42:25 GMT
iowgirl - you are so AWESOME! Thank you so much for taking the time to go thru that, with the pictures and detail! I'm gonna have some time later this morning or later tonight to go at it again, and I'll report back how it goes. THANK YOU!!! 
|
|
iowgirl
Pearl Clutcher
Posts: 4,135
|
Post by iowgirl on Feb 6, 2016 14:11:13 GMT
Glad I could help - and I hope it makes sense! I tried to write as I was working on one, so I didn't miss any steps.. LOL But sometimes my fingers get ahead of my train of thought!
Also - a big THANK YOU to you @devildog! I have always avoided the advanced cut/cut by color settings, but this is a really fun technique. I would have never tried it, if I hadn't read your post!
|
|
Deleted
Posts: 0
May 20, 2024 11:46:34 GMT
|
Post by Deleted on Feb 7, 2016 2:06:57 GMT
iowgirl - I GOT IT, yeah!!!  The only issue is I'm having some hangup and a little fraying on one side of the outside cut line. I'm wondering if it's my mat, since it's happening in the same place. My mat is old, and pretty beat up. I have some new ones so I'll start using one of those, and just might put in a new blade since I have no idea how old mine is (which tells me it's old, lol). It still took me a bit of time because the sticker paper I'm using is really, really thin. I had to bump the blade down to a 1, and it works perfectly! Thanks so much!
|
|
iowgirl
Pearl Clutcher
Posts: 4,135
|
Post by iowgirl on Feb 7, 2016 13:47:36 GMT
Glad it worked!
As far as the one spot that doesn't cut - is it a corner/angle? Is it in one spot only - or is in the same spot on multiple cuts?
You can try "OVERCUT". I actually use this on all my cuts now. It is Line Segment Overcut, and what it does is extend the cut, on an angle cut, by just a tiny bit. Then the blade lifts (instead of swiveling) and starts again just slightly before the cut - so the lines criss cross (overcut). This gives super clean cuts on small letters and anything that has a lot of angles. And since the blade lifts, instead of swiveling - you get a lot less vinyl pulling up, if you are cutting vinyl. It makes cleaner cuts on paper too.
To find it - click on your media type, then scroll down past the blade settings area and choose "LINE SEGMENT OVERCUT ON"
|
|
iowgirl
Pearl Clutcher
Posts: 4,135
|
Post by iowgirl on Feb 7, 2016 13:49:50 GMT
@devildog - here is a screenshot. 1. Click on Material Type (the expanded cut menu doesn't show until you do this) 2. Scroll down to LINE SEGMENT OVERCUT and select ON. 3. Extend your Start and End settings to 0.1 Maybe that will fix your frayed cut!  |
|
Deleted
Posts: 0
May 20, 2024 11:46:34 GMT
|
Post by Deleted on Feb 7, 2016 14:21:34 GMT
iowgirl - Thanks so much for the suggestion! It's amazing all the little extras that can be done to tweak this machine. I think learning this machine and the capabilities is a never-ending project, lol. I had NO clue this option existed.  In my cut though, it's on a straight line. Say my outside box is 4x6, it's about middle way down on one of the 4" sides, if that makes sense. It's the exact same spot on each of the test boxes I cut--the other sides cut beautifully. If changing the mat doesn't fix this, I'll try your suggestion. Thanks so much! 
|
|
iowgirl
Pearl Clutcher
Posts: 4,135
|
Post by iowgirl on Feb 7, 2016 15:27:06 GMT
@devildog You could double check that there is not a break in the line... zoom in really close on the screen to see if there is a break in the line. How did you create the box? With the rectangle tool? Or with the line draw tool? To check to see if there are any nodes not connected (a break in the line). Use the EDIT POINTS tool - I have it highlighted in yellow here. If your shapes are grouped, ungroup it, or the nodes will not show... See how the box on the left has no red dots. The only nodes are the gray ones at each corner. Those nodes tell the machine to change direction of the cut. Click on the box (ungrouped from anything) so it has a selection/bounding box around and then select thet EDIT POINTS tool..  In this example, on the box on the right - I made a cut in the line. Where that cut/break in the line is I now have a red dot. This shows that there is a break in the line. The machine picks up and doesn't cut that very tiny spot. That would cause a break in your cut, although very tiny, it would leave it connected just a bit.  In this screen shot I zoomed WAY in to show that little tiny line break, where the red dot is in the image above this one. Here  You can zoom in and click on that red dot and drag it up to where the line starts above it and they should connect.... Or, you can just make sure you draw a simple box without any breaks using the rectangle tool (there is a rounded one and a square one. I am not 100% sure if this is why your cuts were bad in that one spot - but it sounds like that is the likely case. |
|
Deleted
Posts: 0
May 20, 2024 11:46:34 GMT
|
Post by Deleted on Feb 7, 2016 16:09:26 GMT
I used the rectangle tool. Using the line draw would probably send me into fits, lol.
Can I assume using the rectangle tool wouldn't give me the break since I'm not manually drawing the lines?
|
|
Deleted
Posts: 0
May 20, 2024 11:46:34 GMT
|
Post by Deleted on Feb 7, 2016 16:11:30 GMT
And I am so impressed with your knowledge of this machine. I'm so very technology challenged it's embarrassing, lol.
|
|
|
|
Post by chrispeas on Feb 7, 2016 16:17:28 GMT
Thanks for the tutorials!
|
|
iowgirl
Pearl Clutcher
Posts: 4,135
|
Post by iowgirl on Feb 7, 2016 18:48:07 GMT
Can I assume using the rectangle tool wouldn't give me the break since I'm not manually drawing the lines? It shouldn't... |
|
 )...lot's of stuff! I bought the eBook someone here recommended, and I've learned a lot--yeah! I still have a way's to go, but I'm getting there.


