nicolep
Drama Llama

Posts: 7,080 
|
Post by nicolep on Mar 7, 2017 17:35:45 GMT
I am trying to do as much as I can on my own for our son's 2nd birthday party. I had SO much fun last year making everything for his party and it gave me some major 'playing with my paper' time!  I was going to buy cupcake toppers on Etsy and then after I started looking at them I had my 'ahh ha' moment and thought...I CAN MAKE THESE (when I should have had it way before even thinking of Etsy lol)! So, I have never print and cut anything but I imagined it would be easy so I took a spin around YouTube. Is this how I would do it basically? Seems so easy!? I figured I would flip each image so that I can adhere them back to back and then on a pick to insert into the cupcake. I'm sorry if I sound stupid and I hope I'm explaining myself enough. I think the vehicles would be much cuter if they were cut intricately rather than just in a circle. I know if I print my images first they won't have 'dimension' like these in the first picture but I don't have time to piece together each vehicle lol. I figured printing the images and then cutting them would suffice and still look cute. Something like this... NOT like this... NOT like this...
 |
|
|
|
Post by htstepper on Mar 7, 2017 17:42:38 GMT
I do a lot of print and cut when I am short of time. It is an awesome feature with the Silhouette! Sounds like you have it with the Youtube tutorials. I have also fused the front and back pieces together in studio (I forget how I did it) and so I just had to fold at the top. I have used sticky glue dots in the middle with the toothpicks and another time I used my ATG gun. Both worked.
|
|
nicolep
Drama Llama
Posts: 7,080
|
Post by nicolep on Mar 7, 2017 17:46:03 GMT
I do a lot of print and cut when I am short of time. It is an awesome feature with the Silhouette! Sounds like you have it with the Youtube tutorials. I have also fused the front and back pieces together in studio (I forget how I did it) and so I just had to fold at the top. I have used sticky glue dots in the middle with the toothpicks and another time I used my ATG gun. Both worked. Oh the fusing! YES, that's a great idea. Even more time-saving. I am going to look up how to do it. THANKS! |
|
|
|
Post by warrior1991 on Mar 7, 2017 18:09:43 GMT
I've had my Silhouette for about 2 years now and love it but still sort of new to print and cut. I think if you use a Silhouette image it is much easier. There are extra steps if you use an image from somewhere else. My notes on how I to do this are at home.
Fusing is easy, touch the 2 pieces together, select both then click WELD from the "right click" menu. Clear as mud? LOL
|
|
|
|
Post by anniefb on Mar 7, 2017 19:17:27 GMT
Sounds great nicolep. I love the print and cut feature of the Cameo. If you've found a couple of tutorials I'm sure you'll get the idea of what's required. I've generally had good success with my p & c. You could even cut these from sticker paper I guess, though they might not be as sturdy as from card stock. |
|
iowgirl
Pearl Clutcher
Posts: 4,144
|
Post by iowgirl on Mar 7, 2017 19:34:48 GMT
I love doing Print & Cut. That is what I most use my Cameo for. I also have a large printer, so I can print on 12x12. Love that.
What paper you print on will make a difference. I have found that Hobby Lobby paper/cardstock doesn't cut well - and it is even worse for printing. The colors look drab and muddy.
American Crafts white textured cardstock or even Colorbok white textured cardstock (Walmart in the Crafts area) work great for both cutting and for print quality.
|
|
nicolep
Drama Llama
Posts: 7,080
|
Post by nicolep on Mar 7, 2017 20:11:32 GMT
I've had my Silhouette for about 2 years now and love it but still sort of new to print and cut. I think if you use a Silhouette image it is much easier. There are extra steps if you use an image from somewhere else. My notes on how I to do this are at home. Fusing is easy, touch the 2 pieces together, select both then click WELD from the "right click" menu. Clear as mud? LOL Thanks so much! I think the mud will clear once I try it!  Sounds great nicolep . I love the print and cut feature of the Cameo. If you've found a couple of tutorials I'm sure you'll get the idea of what's required. I've generally had good success with my p & c. You could even cut these from sticker paper I guess, though they might not be as sturdy as from card stock. Yeah, I think I'm going to use a bright white cardstock. As far as sticker paper goes though I should buy some. My little guy loves stickers! (in his hair, on the couch, on our dog lol!) I love doing Print & Cut. That is what I most use my Cameo for. I also have a large printer, so I can print on 12x12. Love that. What paper you print on will make a difference. I have found that Hobby Lobby paper/cardstock doesn't cut well - and it is even worse for printing. The colors look drab and muddy. American Crafts white textured cardstock or even Colorbok white textured cardstock (Walmart in the Crafts area) work great for both cutting and for print quality. Absolutely. I used some EP paper one time and it was horrible. I have learned that I love AC and Bazzill for cutting! |
|
|
|
Post by warrior1991 on Mar 7, 2017 20:53:23 GMT
YES!! Bazzill Smoothie is the BEST for cutting on both the Silhouette and the Cricut, but it is getting harder and harder to find. I heard that AC bought Bazzill, but not sure on that. I found a place about 2 hours away from me who can get paper comparable to Bazzill Smoothie, but VERY hard to get there to pick out paper. So I have to do my shopping over the phone. Okay, hijack over. |
|
nicolep
Drama Llama
Posts: 7,080
|
Post by nicolep on Mar 8, 2017 16:15:17 GMT
Well, I downloaded a trash truck last night from the Silhouette Design Store, ungrouped everything, did a color fill on all the pieces, grouped it back together. Then I looked up a tutorial on how to get the registration marks etc. Printed it out and set it up to cut. EPIC FAIL. LOL. I noticed when I went to cut that the cut lines were all around every single piece of the truck (window, tires, door etc) and that made me nervous but I tried anyway. Yep..it started to cut out every piece of the truck and it was NOT lined up at all anyway. UGH. I just wanted it to cut AROUND the entire shape. It was easy up until the registration marks and the cutting! Although I did watch a registration mark video that was for an older Cameo so Idk! Guess I'll see where I went wrong! Off to watch some more tutorials. I just have to figure it out because the trash trucks are SOOO cute and I also want to do a few more vehicles. If anyone has any pointers I would appreciate it greatly! This pic is horrible. I'm sorry. It was late last night and I guess I was shaking and the colors are way off! The lights on the truck are yellow and not that weirdo cream color lol.  |
|
|
|
Post by htstepper on Mar 8, 2017 19:16:50 GMT
You need to go to the scissors icon and turn off the cutting for each detail. Make sure the cut lines are set for the outer edge only.
Also, move your images away from those XXXXs on your screen (near the registration marks in Studio). Those XXXXs mean don't put your images near those areas.
|
|
christinec68
Drama Llama
Posts: 5,135
Location: New York, NY
|
Post by christinec68 on Mar 8, 2017 21:09:10 GMT
Make sure the cut lines are set to cut the outside lines only and not the inside lines.
|
|
iowgirl
Pearl Clutcher
Posts: 4,144
|
Post by iowgirl on Mar 8, 2017 21:58:52 GMT
nicolep - it appears you have the wrong style registration marks. You need to be using Type 1 (you have Type 2)... unless you have a really (REALLY) old Silhouette SD machine. If you have a Cameo or Portrait - use Type 1. It will have a small black square and two angle marks. Also - if you have converted a cut file into a print file - do make sure you have shut off all the cut lines on everything but the outside shape.
|
|
|
|
Post by anniefb on Mar 9, 2017 17:40:09 GMT
Did you try cutting these again nicolep? Hope you got it worked out. |
|
nicolep
Drama Llama
Posts: 7,080
|
Post by nicolep on Mar 9, 2017 17:45:14 GMT
Yes I did anniefb and I am planning on writing out my big fat update this afternoon LOL. |
|
nicolep
Drama Llama
Posts: 7,080
|
Post by nicolep on Mar 10, 2017 15:41:17 GMT
You need to go to the scissors icon and turn off the cutting for each detail. Make sure the cut lines are set for the outer edge only. Also, move your images away from those XXXXs on your screen (near the registration marks in Studio). Those XXXXs mean don't put your images near those areas. When I went back to the drawing board to retry the only scissor icon I could find would completely cut and delete the selected image. I learned that I needed to use the 'Line Color' and select 'No Color' for it to turn off the cut lines that I didn't want to cut. THANK YOU for explaining the XXXX's. I didn't have a clear understanding of that until you told me. I cleared the trucks away from them and it was perfect! Make sure the cut lines are set to cut the outside lines only and not the inside lines. I finally figured out how to do it the the 'Line Color' selected to 'No Color'. Thanks! nicolep - it appears you have the wrong style registration marks. You need to be using Type 1 (you have Type 2)... unless you have a really (REALLY) old Silhouette SD machine. If you have a Cameo or Portrait - use Type 1. It will have a small black square and two angle marks. Also - if you have converted a cut file into a print file - do make sure you have shut off all the cut lines on everything but the outside shape. I certainly did have it wrong! I had misread the options and had the wrong one selected. DUH! And yep...I had took the hard road (without really realizing that I had lol) and was converting a cut file into a print file. I figured I was just winging it and I'd see how it turned out. HA! So after reading all of your tips and taking your advice I went back to try to get this right. I re-did my selections for the outside lines to be cut only. It turns out that I hadn't selected 'No Cut' on my image BEFORE I printed and I was supposed to according to a YT video. So I selected 'No Cut', turned off the cut lines using the 'Line Color > No Color' options, redid my registration marks and reprinted my trucks. Off to Cameo I went. I loaded my trucks, selected my Cut Settings to 'Cut Edge' and off it went. Well, not really. I immediately got a 'Registration Error'. Good grief! Back to Google I went to learn about this error. On the Silhouette School Blog she listed several reasons why this would happen. I picked the easiest fix...low light. She said that if you're working in low light it can cause the sensor to not be able to read the registration marks. I moved my lamp to my work table and tried it again. WOOHOO...cutting! I was so excited! I watched in anticipation as it was cutting and I started to look closely. I saw that is was NOT lined up with the outline of the trucks. It was cutting off the bottom of the tires! FOR THE LOVE OF PETE!!!  I have to admit that at this point I was ready to go buy cupcake toppers on Etsy and forget about it! I really wanted to make them myself though! I sat there and started thinking and wondering what was wrong. The cut was definitely not right but it wasn't off that far so I figured it had to be something simple.  I wondered about my paper. I had used my trimmer and cut an 8.5x11 piece from a 12x12 piece. So I got a pack of pre-cut 8.5x11 paper out and printed my trucks on that and tried cutting again. BINGO!!!!!!!!!!!! Perfect! I am actually going to re-cut them again though because the piece of paper I grabbed out of the pack of 8.5x11 is a cream color and I want white but this gives you an idea! I also need to tweak the lining up of a few of the intricate pieces but overall I'm happy and yes... I realize these are going to be plucked from the cupcake and trashed but it's my little guy. He's totally worth all this hassle!  This was ridiculously exhausting but now I know how to do it at least! A plain Cut and Print project should be a piece of cake after this, lol. Now I have to make fire trucks, dump trucks etc. Thanks to ALL of you for your help! I seriously love the Peas and their wealth of knowledge! I also love my Cameo and can't wait to learn more and do more with it! |
|
christinec68
Drama Llama
Posts: 5,135
Location: New York, NY
|
Post by christinec68 on Mar 10, 2017 16:23:11 GMT
Wow...good for you with your persistence!! It certainly paid off as the trucks look great and now you know how to do it! I did the same thing with some vellum words I wanted to try making a couple of years ago - it took me 3-4 nights of playing around, videos, tutorials, (you know) before I was able to get something resembling what I was looking to do and it felt victorious when I got it to work. I am sure you felt the same way!
|
|
|
|
Post by anniefb on Mar 10, 2017 16:44:14 GMT
Well done you nicolep! Those trucks look amazing. Print and cut took me a few goes to work out as well but once you've got it sorted you'll have such fun! |
|
iowgirl
Pearl Clutcher
Posts: 4,144
|
Post by iowgirl on Mar 10, 2017 21:01:24 GMT
Those do look great! Paper size is super important. If the paper you cut wasn't quite exactly 8.5x11 - and your page size in the software was 8.5x11 - there will be trouble.. LOL A really great and inexpensive paper for Print & Cut is ColorBok from Walmart - it's in the scrapbook area. You can get it in 8.5"x11" pads (and 12x12). Get the white textured - it looks FABULOUS when printed on! It cuts great too! Here are some tips for Print & Cut. 1. Make sure your page size is set right - it must match the exact size of the paper you are printing on. 2. Choose CURRENT PRINTER 3. Make sure you have the mat selected that you are using. If you have a Cameo - it is the 12x12. 4. Turn on Show Cut Border and Show print Border. All designs must be withing the Cut Border. The registration marks must be within the Print border. Nothing should be touching the hashed marked areas either. Lighting really doesn't play into it as much as having everything printed correctly. What you see on the screen should be EXACTLY how it is when printed. The marks should be in the exact same spots as you see on the screen. 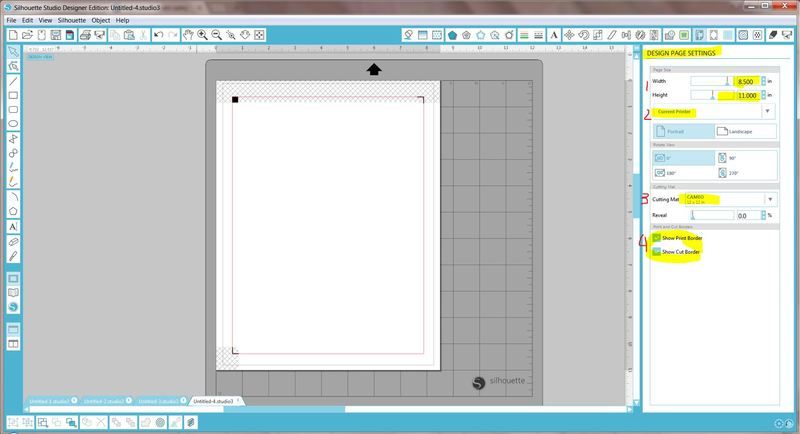 |
|
iowgirl
Pearl Clutcher
Posts: 4,144
|
Post by iowgirl on Mar 10, 2017 21:09:48 GMT
You can also go in and shut off cut lines by opening the Cut Settings Window (second icon from the right, top toolbar). Select the parts you do not want to cut, and choose "NO CUT" .. for parts you do want to cut - choose CUT. 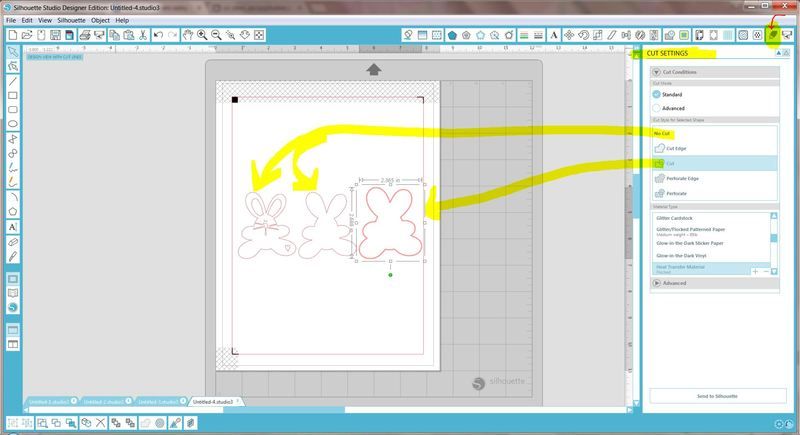 You need to go to the scissors icon and turn off the cutting for each detail. Make sure the cut lines are set for the outer edge only. - I think you might be using some OLD software. That icon (scissors) no longer is there for the Cut settings menu. The Cut Settings icon is now the second from the right in the current software |
|
|
|
Post by crazy4scraps on Mar 11, 2017 2:21:31 GMT
Nice job on the trucks, and way to work though it too!  My newer cutter (Silver Bullet) has a laser thing for doing print and cut and I wanted to try doing these cute princesses from Lettering Delights for her 5th birthday for cupcake toppers. I ended up just cutting them out by hand because it was just quicker and easier to do it sitting in my easy chair than fighting through that learning curve! |
|
|
|
Post by anniefb on Mar 11, 2017 3:04:10 GMT
I just made 4 sheets of stickers for my 3 year old niece. Love the print and cut feature!
|
|
nicolep
Drama Llama
Posts: 7,080
|
Post by nicolep on Mar 13, 2017 20:27:27 GMT
Fire trucks are up next and it's working beautifully! School buses soon to come lol.  |
|
nicolep
Drama Llama
Posts: 7,080
|
Post by nicolep on Mar 13, 2017 21:56:10 GMT
iowgirl I very much appreciate your time and details. Seriously, so helpful!!
|
|
|
|
Post by htstepper on Mar 14, 2017 4:02:35 GMT
htstepper - I think you might be using some OLD software. That icon (scissors) no longer is there for the Cut settings menu. The Cut Settings icon is now the second from the right in the current software Yes, sorry, I just recently upgraded in December. I forgot it is that blade icon now for the cut settings. The scissors were so much easier for me to remember. |
|
iowgirl
Pearl Clutcher
Posts: 4,144
|
Post by iowgirl on Mar 14, 2017 14:11:37 GMT
Yes, sorry, I just recently upgraded in December. I forgot it is that blade icon now for the cut settings. The scissors were so much easier for me to remember. The changes from V2 to V3 took a bit to adjust to... and guess what.... V4 is in BETA testing and will be released soon. It does look different, but everything is still there. It will have some nice new features. One is "Trace By Color". It is only available if you have Designer Edition. I haven't played with it too much yet. |
|
iowgirl
Pearl Clutcher
Posts: 4,144
|
Post by iowgirl on Mar 14, 2017 14:33:17 GMT
|
|
|
|
Post by warrior1991 on Mar 14, 2017 17:18:41 GMT
I thought it was recommended not to update because of the cloud or something?
Or am I mis-informed?
|
|
iowgirl
Pearl Clutcher
Posts: 4,144
|
Post by iowgirl on Mar 15, 2017 18:22:15 GMT
I thought it was recommended not to update because of the cloud or something? Or am I mis-informed? The "cloud" update was pretty buggy. I think they have most of the kinks worked out. The main bugg-a-boo with it, is if you have a lot of your own files stored in the Library. Those didn't always (almost never) get backed up and transferred when you did the update. Files purchased from Silhouette are fine, but ones you created yourself or obtained from outside sources were gone. It is recommended that you do not store your own files in the Studio library, or if you do - keep a backup copy of those files in a folder outside of the Studio software. I do like having my designs in the Library, because it is easier to view them. And I have a ton of patterns (mostly digital paper) in the Patterns library. I just restored those files after I did the update. Eventually you need to do the updates, or get so far behind that things will stop working. |
|
|
|
Post by warrior1991 on Mar 15, 2017 18:41:20 GMT
Okay, good to know. I have A LOT of my own files saved. I'll have to check where they are saved at. Everything on my computer is backed up off site, so I'll have to make sure those files are backed up too and if not, get them backed up. Thank you for your wisdom. |
|


 I have to admit that at this point I was ready to go buy cupcake toppers on Etsy and forget about it! I really wanted to make them myself though! I sat there and started thinking and wondering what was wrong. The cut was definitely not right but it wasn't off that far so I figured it had to be something simple.

 My newer cutter (Silver Bullet) has a laser thing for doing print and cut and I wanted to try doing these cute princesses from Lettering Delights for her 5th birthday for cupcake toppers. I ended up just cutting them out by hand because it was just quicker and easier to do it sitting in my easy chair than fighting through that learning curve!